Present a single login page for all your service (HOW TO)
The problem we are trying to solve
More and more software that is useful today is distributed as web applications. Some comes with docker images, some have to be installed with handling dependencies. Most of them implements some form of login (authentication) to access them.
While having one or two of them is manageable, with many of those installed, it becomes a chore to log into each application and deal with their own expiration date. The interface isn't consistent either so it's disturbing for a user (even for a tech savvy user), so it'd be prone to phishing attacks.
In this tutorial, I'll try to explain and implement a solution so that you have a single login page for all your applications, while protecting them from abuse and unwanted attackers.
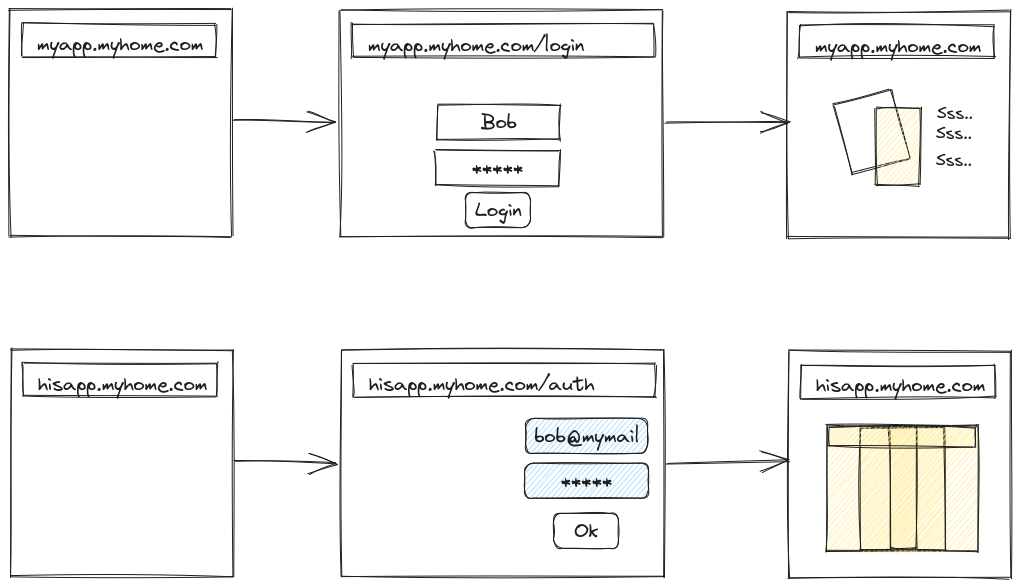
So instead of this:
What is Single Sign On (SSO) ?
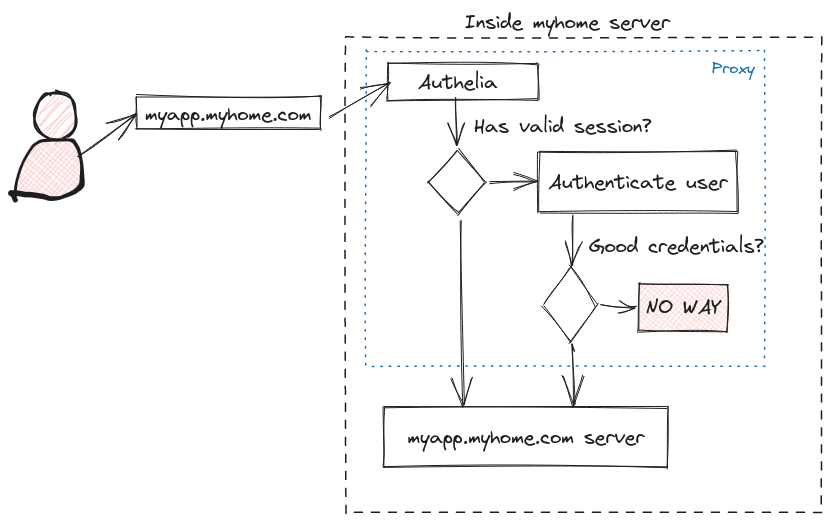
The tech sphere loves to use glossary and acronyms, so we have to learn their language to use their tools. SSO stands for single sign on. It's a collection of techniques to defer authentication to a single service that'll check whether a user of a ressource is authorized to access this ressource. If she is, the process is transparent and the service doesn't get in the way. Else a redirect to the login page is performed and credentials are verified.
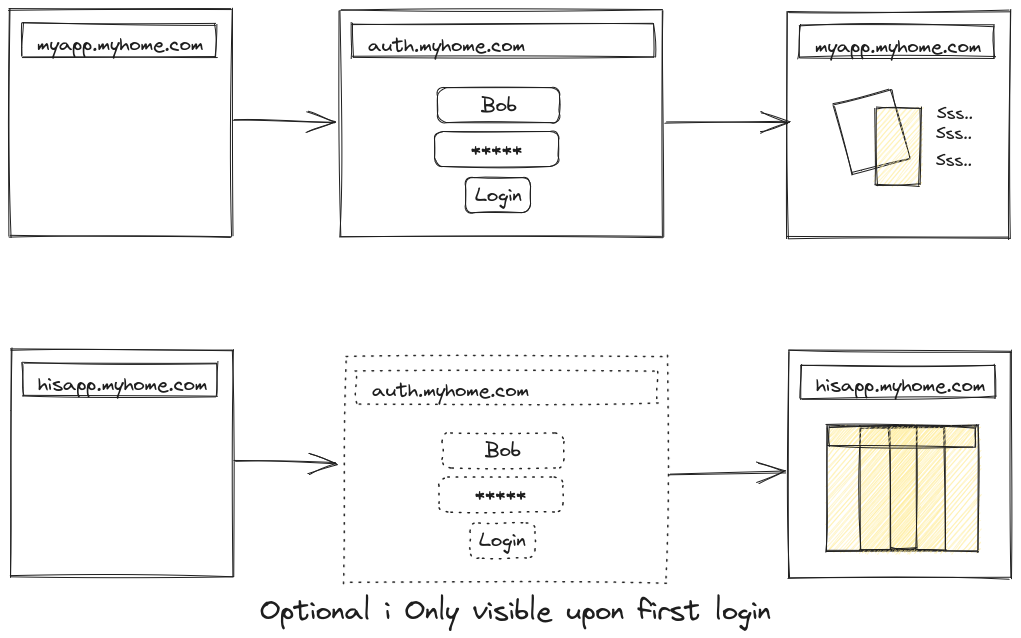
It'll act like this:
Why is it better than multiple login pages ?
The more applications you have, the higher the risk that one is compromised/hacked. If a login can be bypassed in one application, the attack surface of the complete application is available for the hacker. With a SSO solution, the login being redirected to a single application, there only one code that needs to be well audited and secure anymore. With such solution, the user will always be presented the same login page whatever the final applications she will be using. So phishing attacks are harder, since it's harder to fool someone on a tool she's used to use than on some sparsely used application.
How was it done before SSO was a thing ?
One old solution to this problem was to use a software stack with the same framework (for example, a PHP website, and hook into session_start for each application in the login process). But this solution becomes unmanageable as soon as you mix different software stacks (PHP, Laravel, Go, npm, etc...).
Then different solution appeared, with hard to guess acronyms and even harder to explain (like SAML, OIDC, OAuth2...).
Internally, it's behaving more or less like this:
Ok, Got it, let's do it!
They are multiple tutorial to install Authelia from a docker container (like this one)
However, I don't think it's a good idea to use a docker container here, it makes maintenance harder (one often forget to update her container since it's separated from the OS update system) and doesn't really improve security here (since one should still open the same port for the docker's container), reduce the performance (proxying network connections from containers to containes have a price).
I think it's best to plug Authelia from your distribution's package instead. The proxy doesn't consume many ressources, so it's quite safe to use on even a small red-fruit board.
So this tutorial is using Debian stable as a base platform, but the same would work for any supported distribution.
I'm expecting you already have a domain name you are managing (in all the example I'm using, it's myhome.com), and you know how to add entries in your DNS.
You'll need to add a CNAME entry or a A (or AAAA) entry with name auth.myhome.com. that's pointing to the same address as your server's public IP (typically, copy what's in myapp.myhome.com and customize).
As usual, in the code sections below, if the prompt is starting by $, the command should be run by your standard user. If it starts by # then it should be run as root.
Don't type the prompt in your terminal, only the command.
Step 1: Installing Authelia
Add the Authelia's signing keys so the packages can be installed on your system
$ curl https://apt.authelia.com/organization/signing.asc | sudo apt-key add -Then register the repository address and fetch it:
$ sudo apt-get install apt-transport-https --yes
$ echo "deb https://apt.authelia.com/stable/debian/debian/ all main" | sudo tee /etc/apt/sources.list.d/authelia-stable-debian.list
$ sudo apt-get update
Finally, install it
$ sudo apt install autheliaStep 2: Configuring Authelia
I'm posting a dumb configuration file here, and I'll explain what to customize to fit your installation. If you have multiple application to protect with Authelia, you'll adjust the configuration as described in my comments
Start whatever editor you prefer to open /etc/authelia/configuration.yml. Then I'm changing the keys like this:
| Configuration key | Meaning | Example |
|---|---|---|
| jwt_secret | A random string that can't be guessed by an attacker | Generate one by typing head /dev/random | tr -dc A-Za-z0-9 | head -c64 > jwt_secret.txt and paste it here between quotes |
| default_redirection_url | If the user browse directly to auth.myhome.com, Authelia can not deduce where to redirect her back. So this will likely be a list-all-the-applications-you-can-run page | https://www.myhome.com |
| default_2fa_method | 2FA stands for 2 factor authentication. This is the pesky process that ask you to enter code you've received by SMS or from an authenticator app. | totp, so at least it's free |
| server/host | Here lies dragons. If you leave the default 0.0.0.0 then Authelia will listen on your server's network interface. But you don't want that once it's in production, since we will run it behind a reverse proxy for HTTPS. |
While configuring, leave 0.0.0.0 but change to 127.0.0.1 once everything is configured |
| log/level | Change to info once everything is running |
info |
| authentication_backend | Enable the file and file/path sub key for ease of use at first. Below, you'll find what to store in that file path |
Change path to /etc/authelia/users_db.yml |
| access_control | This part is a bit complex, so please look below for an explanation | See below |
| access_control/rule/.../policy | Any of deny (rejects the request), bypass (transparently proxy the connection), one_factor (ask for login & passwords), two_factor (ask for login & password + proof of owning a device) |
See below for an example |
| session/domain | Typically, set the base domain | myhost.com |
| session/secret | Another random string that can't be guessed by an attacker | Generate one by typing head /dev/random | tr -dc A-Za-z0-9 | head -c64 > session_secret.txt and paste it here between quotes |
| storage | Enable this, since it's required to store session data | |
| storage/encryption_key | Another random string that can't be guessed by an attacker | Generate one by typing head /dev/random | tr -dc A-Za-z0-9 | head -c64 > session_secret.txt and paste it here between quotes |
| notifier | You'll need to set at least one notifier so Authelia can communicate with you and its users |
Access control rules
When Authelia intercept requests, it checks rules sequentially until it finds one that's matching. The rule gives an action to perform. A good practice is to write rules backward, starting from the most restrictive rule to the less restrictive rule. So when you read a rule in the configuration file, you are sure that if it isn't matching, Authelia will reject the request.
A typical example is like this:
rules:
    - domain:
        - "auth.myhome.com"
      policy: bypass
    - domain:
        - "*.myhome.com"
        - "myhome.com"
        - "app.myhome.com"
      policy: one_factor
The default policy is deny, so if no rule match, the user is rejected.
The first rule for auth domain is written so if the user requests auth.myhome.com then she's allowed to do so, she can access Authelia login page.
The second rule is showing different way to do more or less the same thing: if the user access myhome.com or subdomain.myhome.com or app.myhome.com she'll be required to authenticate first.
If you have numerous applications, you can list them explicitly here, or use a wildcard.
Please notice that auth.myhome.com is a subdomain, but since the rule is listed first, it matches first, so no authentication is required for it.
User database
You'll need to create a user database. This configuration is ok if you don't have plenty of users to manage. If it's not the case, you'll have to dig into Authelia documentation to use a LDAP server or equivalent. Also, this configuration is not made for running multiple Authelia instances, since they will all refer to the same database.
The user database is a file called /etc/authelia/users_db.yml that's containing:
users:
  yourname:
    displayname: "Your Name"
    # Generate with: authelia hash-password <your-password>, and copy from the first '$' to the end of the digest.
    password: "<hashed-password>"
    email: <your-email>
    groups:
      - admins
Obviously, replace yourname and all the other placeholders to your informations.
Once you are done, start Authelia with:
$ sudo systemctl start autheliaand open your browser at "http://localhost:9091"
In case of errors, you can have more informations in the log, via:
$ sudo journalctl -u autheliaStep 3: Setting up the HTTPS part
Since Authelia displays a login/authentication page, it must be run on an encrypted transport channel to avoid man in the middle (MITM) attacks.
It will not start until this is set up correctly.
As usual with HTTPS, to start a TLS connection, you need a certificate. The easiest solution is to use Let's Encrypt or ZeroSSL with its certbot tool to automate fetching and renewing the certificates. This isn't a tutorial on setting up HTTPS, so I'm listing the steps to perform with a NGINX reverse proxy, feel free to customize if you're using another reverse proxy for HTTPS.
You'll create a file in /etc/nginx/sites-available/auth.myhome.com containing:
server {
    server_name auth.myhome.com;
    listen 80;
    return 301 https://$server_name$request_uri;
}

server {
    server_name auth.myhome.com;
    listen 443 ssl http2;

    ssl_certificate /etc/letsencrypt/live/myapp.myhome.com/fullchain.pem; # managed by Certbot
    ssl_certificate_key /etc/letsencrypt/live/myapp.myhome.com/privkey.pem; # managed by Certbot
    ssl_session_cache shared:SSL:2m;

    location / {
        set $upstream_authelia http://127.0.0.1:9091;
        proxy_pass $upstream_authelia;

        client_body_buffer_size 128k;

        #Timeout if the real server is dead
        proxy_next_upstream error timeout invalid_header http_500 http_502     http_503;

        # Advanced Proxy Config
        send_timeout 5m;
        proxy_read_timeout 360;
        proxy_send_timeout 360;
        proxy_connect_timeout 360;

        # Basic Proxy Config
        proxy_set_header Host $host;
        proxy_set_header X-Real-IP $remote_addr;
        proxy_set_header X-Forwarded-For $proxy_add_x_forwarded_for;
        proxy_set_header X-Forwarded-Proto $scheme;
        proxy_set_header X-Forwarded-Host $http_host;
        proxy_set_header X-Forwarded-Uri $request_uri;
        proxy_set_header X-Forwarded-Ssl on;
        proxy_redirect  http://  $scheme://;
        proxy_http_version 1.1;
        proxy_set_header Connection "";
        proxy_cache_bypass $cookie_session;
        proxy_no_cache $cookie_session;
        proxy_buffers 64 256k;

        # If behind reverse proxy, forwards the correct IP
        set_real_ip_from 10.0.0.0/8;
        set_real_ip_from 172.0.0.0/8;
        set_real_ip_from 192.168.0.0/16;
        set_real_ip_from fc00::/7;
        real_ip_header X-Forwarded-For;
        real_ip_recursive on;
    }
}
Change to your domain name in the file above.
The part that reads myapp.myhome.com is using an invalid SSL certficate (the one you're already using for your app at myapp.myhome.com).
Don't worry, we'll change it later, it's required for now for NGINX to accept the configuration.
You must then create a link to enable the server:
$ sudo ln -sf /etc/nginx/sites-available/auth.myhome.com /etc/nginx/sites-enabled/auth.myhome.comThen you'll restart NGINX via sudo systemctl restart nginx and generate a good certificate via sudo certbot run -d auth.myhome.com --nginx
Points your browser to https://auth.myhome.com and you should be prompted with Authelia's login page.
If it works, reopen the file /etc/authelia/configuration.yml and change the host part to 127.0.0.1, to avoid exposing the service directly to the internet.
Step 4: Preparing your application for SSO
Ok, now Authelia is working, but your application isn't customized yet to work with it.
The application must be adapted to deal with an external authentication server. In the diagram above, when Authelia has validated the user, it redirects to your application.
This redirect contains specific headers that your application must deal with to proceed with its usual session creation (typically, your application will emit its Set-Cookie or local storage request or a JWT token or ...). It's just bypassing the login page.
If you don't master your application, this can be tricky to implement by yourself. However, a lot of volunteers has probably dealt with it, so most of the time, it's just a matter of finding the right patch and/or configuration options.
Yet, we must still ensure that this process is secure, as you don't want a remote user presenting the specific headers to gain access to your application without actually being authenticated.
This is what we'll do now.
Typically, we are using NGINX again here, so we'll start to build up some configuration snippets that can be re-used in all your applications.
The first snippet is an internal route /authelia that's not accessible from the internet, that used in your applications to assert that the Authelia session is valid.
Save this file as /etc/nginx/snippets/authelia.conf
# Virtual endpoint created by nginx to forward auth requests.
location /authelia {
    internal;
    set $upstream_authelia http://127.0.0.1:9091/api/verify;
    proxy_pass_request_body off;
    proxy_pass $upstream_authelia;
    proxy_set_header Content-Length "";

    # Timeout if the real server is dead
    proxy_next_upstream error timeout invalid_header http_500 http_502 http_503;

    # [REQUIRED] Needed by Authelia to check authorizations of the resource.
    # Provide either X-Original-URL and X-Forwarded-Proto or
    # X-Forwarded-Proto, X-Forwarded-Host and X-Forwarded-Uri or both.
    # Those headers will be used by Authelia to deduce the target url of the     user.
    # Basic Proxy Config
    client_body_buffer_size 128k;
    proxy_set_header Host $host;
    proxy_set_header X-Original-URL $scheme://$http_host$request_uri;
    proxy_set_header X-Real-IP $remote_addr;
    proxy_set_header X-Forwarded-For $remote_addr;
    proxy_set_header X-Forwarded-Proto $scheme;
    proxy_set_header X-Forwarded-Host $http_host;
    proxy_set_header X-Forwarded-Uri $request_uri;
    proxy_set_header X-Forwarded-Ssl on;
    proxy_redirect  http://  $scheme://;
    proxy_http_version 1.1;
    proxy_set_header Connection "";
    proxy_cache_bypass $cookie_session;
    proxy_no_cache $cookie_session;
    proxy_buffers 4 32k;

    # Advanced Proxy Config
    send_timeout 5m;
    proxy_read_timeout 240;
    proxy_send_timeout 240;
    proxy_connect_timeout 240;
}
You'll also need a snippet for (the internal) authentication itself, so save this snippet as /etc/nginx/snippets/auth.conf (replace myhome.com with your domain):
Typically, this snippets make NGINX to generate a request to internal location /authelia whenever a user request to your application is made. It checks the internal request's HTTP result code. If it's 200, the user request is granted, else it's redirected to Authelia login page.
# Basic Authelia Config
# Send a subsequent request to Authelia to verify if the user is authenticated
# and has the right permissions to access the resource.
auth_request /authelia;
# Set the `target_url` variable based on the request. It will be used to build the portal
# URL with the correct redirection parameter.
auth_request_set $target_url $scheme://$http_host$request_uri;
# Set the X-Forwarded-User and X-Forwarded-Groups with the headers
# returned by Authelia for the backends which can consume them.
# This is not safe, as the backend must make sure that they come from the
# proxy. In the future, it's gonna be safe to just use OAuth.
auth_request_set $user $upstream_http_remote_user;
auth_request_set $groups $upstream_http_remote_groups;
auth_request_set $name $upstream_http_remote_name;
auth_request_set $email $upstream_http_remote_email;
proxy_set_header Remote-User $user;
proxy_set_header Remote-Groups $groups;
proxy_set_header Remote-Name $name;
proxy_set_header Remote-Email $email;
# If Authelia returns 401, then nginx redirects the user to the login portal.
# If it returns 200, then the request pass through to the backend.
# For other type of errors, nginx will handle them as usual.
error_page 401 =302 https://auth.myhome.com/?rd=$target_url;
Finally, in your application site description, you'll have to include these snippets. The authelia.conf goes in the server block and the auth.conf goes in any location you want to protect.
You'll typically avoid protecting static assets and redirect, since there's no value in checking the authentication for those. An example application might look like this:
server {
    server_name app.myhome.com;
    listen 80;
    return 301 https://$server_name$request_uri;
}

server {
    server_name app.myhome.com;
    listen 443 ssl http2;
    include snippet/ssl.conf;

    include snippets/authelia.conf; # Authelia auth endpoint

    location / {
        proxy_pass http://proxied:service;
        proxy_set_header Host $host;
        proxy_set_header X-Real-IP $remote_addr;
        proxy_set_header X-Forwarded-For $proxy_add_x_forwarded_for;

        include snippets/auth.conf; # Protect this endpoint
    }
}
Restart NGINX and try to browse to your application (you might want to clear your browser's cache and cookies first to avoid having lingering sessions). You should be redirected to Authelia login page.
The next article will show an example for Owntone music server