Replacing a lead acid by a Lithium Iron Phosphate battery
If you own a lead acid battery in your motorhome, like many of us do, at some point in time, you'll have to replace it (usually, every 2 to 4 years depending on the usage of the vehicle). While it's tempting not to change anything, lead acid batteries are expensive to use (yes, compared to Lithium battery, if you account for actual usage cost) and have many painful cons.
Comparing lead and lithium batteries
Cons for Lead acid battery
- Short battery life (300 charge cycles, so on a 3 month usage per year it's only 3 years)
- Heavy (it's lead, it's heavy, it's metal)
- Can't be discharged more than 50% without damaging the life expectancy. This also means that you carry 50% of the weight for nothing.
- Self discharge is frequent and can be fatal to the battery. If left for too long and the battery goes under 10V, it's dead.
- Lead is toxic. But it's recyclable too.
Pros of Lead acid battery
- You can charge it very easily, it's quite tolerant to bad charging procedure.
- So well known that many (if not all) charger and electric unit in motorhome are made for Lead batteries.
- Can be bought almost anywhere (but be warned about the poor warranty for the battery)
In this post, I'll present the Lithium Iron Phosphate battery advantages (and cons), also known as LiFePo4 batteries.
Cons of LiFePo4 battery
- A bit more expensive to buy at same energy level than lead version, althrough the cost is falling down.
- Likely need to change all electrical system in your motorhome to deal with
Pros of LiFePo4 battery
- When accounting all usage cost, a LiFePo4 is cheaper to use than lead. Why: because for a 100Ah lead battery, you only have 50Ah to 60Ah you can use, and you can use it for 300 cycles, so it's 1500Ah per product. On a LiFePo4 battery, you'll use 80Ah to 90Ah for at least 2000 cycles, so it's a 160000Ah per product. If the lithium battery costs 3x more than lead (and this is falling), it's still 35 times cheaper than lead after usage.
- Charges very very fast. Lead battery can only be charged at C/10 current. It means that a lead battery of 100Ah can only sink 10A of current. Recharging from 50% to 100% will take 5 hours. A similar lithium battery can take C/1 current, so it can be charged at 100A (althrough, for cost reason, you don't want such huge current in your small wires). Even at 50A, recharging it will only take 1 hour.
- Almost no self discharge. A Lithium battery does not leak its charge like a lead battery. If you leave your motorhome unattended for 6 months, you'll still have 88% of your full battery remaining. A lead battery will likely be dead in such scenario
Installing / Upgrading a LiFePo4 battery
Ok, so I've convinced you to upgrade your lead battery to a lithium one. What are the steps required to install one ?
First, you must make sure about what needs to be changed in your motorhome. If you are starting from scratch, it's might be easier (see below). In a typical electrical installation in a motorhome, you'll find:
- An AC distribution box (with a typical 30mA interruptor)
- An AC/DC charger (generating 12V to charge the lead battery from the main voltage)
- A DC distribution box (with many fuses & sensors & relay)
- A solar charger
- A control panel to activate, monitor and control systems of your motorhome.
In some cases, some of the systems above are combined (and in that case, you'll have more difficulties to upgrade them). For example, Calira systems are typically combining the AC/DC charger and the DC distribution box. The control panel is always linked with the DC distribution box. So if you need to change one, you need to change the other.
Can I just swap both batteries ?
No you can't.
Lead charging cycle is different from Lithium. Lead charging requires a voltage of 14.2V/14.4V for a small amount of time (constant voltage phase) and then need less for the constant current phase and the floating phase at 13.6V. Lithium on the opposite need a constant 14.4/14.6V while monitoring the current since, for lithium, the voltage almost never change until the battery is depleted.
It'll appear to work, since the LiFePo4 batteries have a BMS (battery management system), but they'll never reach a complete charge, and depending on the charger, you'll likely burn the charger since it'll either never reach the constant current phase, heating up out of spec, or will become a current sink if it enters the floating phase (the battery voltage is higher than the floating voltage, the current will flow in reverse). If it's doing desulfation (a good lead acid charger should do that regularly), it'll also risk breaking the BMS.
So what to do ?
First, identify in your motorhome's technical documentation if the AC/DC charger and the DC distribution box can both support lithium battery (with a switch or by programming it differently). If it's the case, it might be as simple as changing the switch position, swapping the batteries and be done. Unfortunately, most AC/DC charger installed up to 2018 are lead acid only.
If you have a Nord Electronica or CBE system where the AC/DC charger is separated from the DC distribution box, the solution is quite simple (see below). You'll have to identify the relay that's connecting the truck start battery (called starter) to the main battery and remove it. You must remove it or disable it, since if this relay triggers, it'll connect both positive (and ground) poles of the batteries and the lithium battery will instantly try to discharge in the starter battery (likely lead battery) and kill it or burn the wires. Since the lithium battery has a higher voltage than the lead battery, a huge current will flow to the lead battery until it's equalized. The wires between both batteries aren't made for such current (that can be 2C for some lithium battery, so likely 200A for a 100Ah) so you'll have a problem.
The relay is used usually so that the truck generator can also charge the main battery. In our installation, we'll use another system for this that's more efficient, so it's perfectly fine to disable it.
On CBE system, disabling the relay is done by removing a pass-through resistor (see the manual for locating it) so it's very simple.
On Nord Electronica system, it's a bit more complex, you'll likely need to de-solder the relay that's between J1 and J2 (again, check the manual for locating the relay)
If you have a Calira system, they combine the AC/DC charger with the distribution box. It's the same PCB for both so it's almost impossible to disable the charging feature (that's lead battery only) and in that case, it's unfortunate that you'll need to change the distribution box and the control panel.
You'll then remove the AC/DC charger (you don't need it anymore), and if you follow the diagram below, you'll also remove the solar charger. That's 1 to 2kg saved!
You'll need to check the diameter of wires between your truck and the main battery. The shorter diameter is what you are looking for (if, for example, you have an AWG 8 wire going from the truck battery to some switch and from them, you only have a AWG 10 wire to the battery, the diameter to account for it AWG 10).
For convenience, here's a table of external diameter (what you'll measure with a caliper) to the wire dimension and the absolute maximum current it could handle (better to take some margin here):
| Nominal size (mm²) | Wire diameter (mm) | Wire + insulation diameter (mm) | Maximum current (A) |
|---|---|---|---|
| 0.5 | 0.9 | 2.10 | 10A |
| 0.75 | 1.15 | 2.35 | 12A |
| 1 | 1.25 | 2.45 | 15A |
| 1.5 | 1.55 | 2.95 | 18A |
| 2 | 1.7 | 3.30 | 26A |
| 2.5 | 1.97 | 3.57 | 34A |
| 4 | 2.5 | 4.10 | 44A |
| 6 | 3.10 | 4.70 | 61A |
| 10 | 4.30 | 6.30 | 82A |
| 16 | 5.40 | 7.40 | 108A |
| 25 | 6.80 | 9.20 | 135A |
| 35 | 7.85 | 10.25 | 168A |
| 50 | 9.30 | 12.10 | 207A |
| 70 | 11.25 | 14.05 | 250A |
| 95 | 12.50 | 15.70 | 292A |
| 120 | 14.00 | 17.20 | 335A |
| 150 | 15.50 | 19.10 | 382A |
| 185 | 17.70 | 21.70 | 453A |
| 240 | 20.00 | 24.40 | 523A |
Some example installation
Here's some installation diagram after the lithium battery is installed.
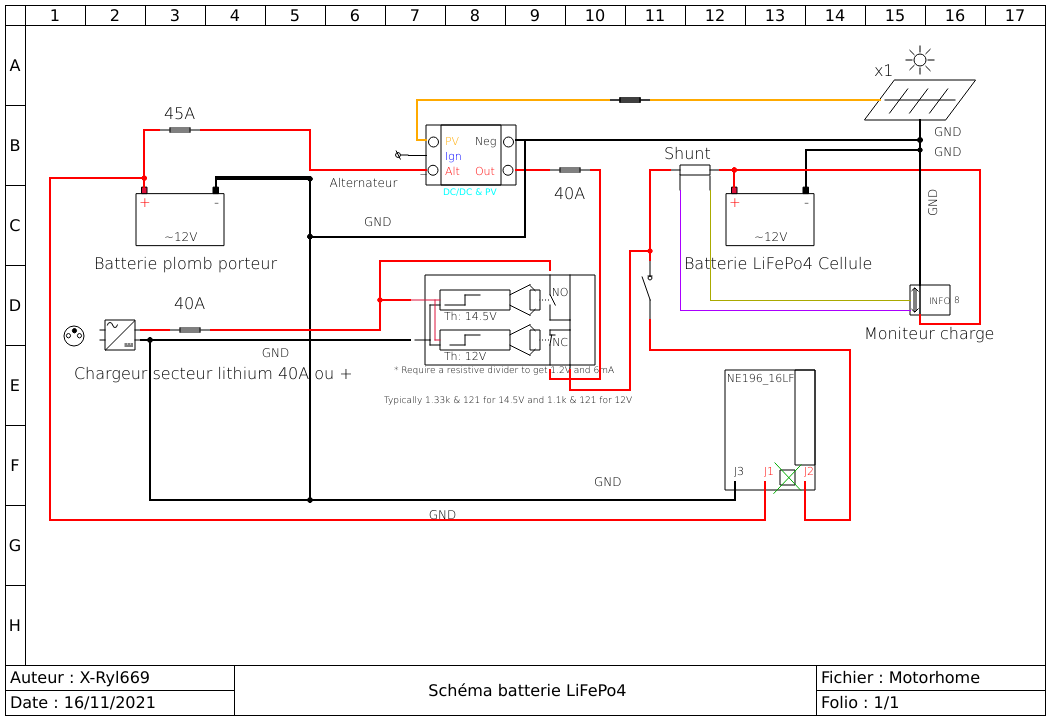
This installation is made for 6mm2 wires and Nord Electronica system. The Relay RE1 must be removed.
The central 2 relays system is used to sequence cutting the Renogy DC/DC charger first before connecting the AC/DC charger. A simple optocoupler with a resistor divider (see schematic for the value) on input will control 2 relays. One is in NC mode and is in charge of isolating the DC/DC charger from the battery. It triggers at 12V. Then the other one is a NO mode and will connect the AC/DC charger to the battery. It triggers at 14.7V.
This means that when the AC/DC charger is plugged on the main grid, its output will rise from 0V to 14.7V. At 12V the DC/DC charger is disconnected from the battery and at 14.7V the AC/DC charger replace it. When unplugged, the AC/DC charger will be disconnected from the battery first and then the DC/DC charger will be connected back to the battery.
The threshold circuit is using off the shelf module with this schematic:
 The optocoupler used is a PC817X model with a threshold voltage of 1.2V.
Sponsored links
In order to pay for infrastructure cost for this blog, I'm listing some affiliated links about the hardware listed above.
-
Amazon
DC/DC MQTT Charger
-
Amazon
Battery level monitor
-
Amazon
High current terminal
-
Amazon
Crimping tool
-
Amazon
8 AWG wire pair
-
Amazon
Winter starter charger
-
Amazon
Fuse holder
-
Amazon
Fuse holder for 45A fuse
-
Amazon
40A fuse
-
Amazon
Fuse set up to 45A
-
Amazon
Opto-isolated relay control
-
Amazon
80A 5 pins relays
-
AliExpress
 AC/DC 40A Charger
-
AliExpress
 150Ah LiFePo4 battery
-
AliExpress
 DC switch


