Tutorial to install PostmarketOS on IdeaPad Duet 3 Chromebook
Few definitions first:
- PostmarketOS is a linux distribution made for Chromebook devices. It's the only image that supports Qualcomm Snapdragon 7 in the Lenovo IdeaPad Duet 3
- ChromeOS is an operating system made for Chromebook devices, made by Google. It's mainly linux based, with its numerous quirks
- Developer mode is a special mode for ChromeOS made to allow full control on the device
What we gonna do
We want to nuke the ChromeOS operating system and replace by a full linux system. We have to fight against all doors and locks and threats that Google left for us, so let's dive in. You don't need to have any user set up, the process below works from the "bootstrap" screen when you first power on the tablet.
Entering developer mode
First things first, you need to enter developer mode or everything else will fail. Doing so will erase the device's user data so make a backup first if you've already installed something on this device. The process is the following:
- Detach the keyboard (to avoid doing something wrong ...)
- Power off the device (you can apply this process even if the device is not installed)
- Press
Volume +,Volume -andPowerat the same time and hold them for 10s. - Release
Powerbutton, the tablet will enter recovery screen (if not, power off and retry). - Once in recovery screen, use
Volume +,Volume -to navigate andPowerto confirm. - Go to
Show debug infobutton and validate it - It opens a new page. Press both
Volume +,Volume -at the same time and pressPower. I don't remember for how long you need to press it, but it should sayDeveloper mode enabled - Then select
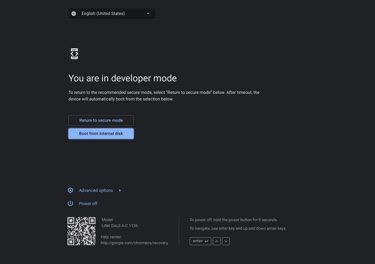
Boot from internal diskand pressPower. - It'll boot to the main screen, but you'll now have an option labelled
Activate debug featuresor something like this - Click the button. You can attach the keyboard now.
- It'll tell you it need to reboot to activate the feature, let it reboot
- Re-run
Boot from internal diskand click again the debug button on the main interface. It'll ask you to set the root password. - Congratulation, you're now a fully featured developer.
Preparing disks
You'll need to download a PostmarketOS image first, for example from here. You ever select the edge or the stable release version (24.12 at time of writing), then the device (google-trogdor) then the linux frontend (I've chosen Plasma desktop here, since it's the best ;-)
Once the disk image is downloaded, check the checksum is correct (with sha256sum /path/to/downloaded/image/file.zip) and compare with the published checksum on the website.
Don't worry here if you don't find the exact frontend you want, we'll bootstrap postmarketos from itself.
Flash the image to a USB drive (don't use a SD card reader, they are so slow). You can use your preferred method here (from plain old dd to Raspberry Pi Imager.
The latter allows to flash using the compressed image, else you'll need to run xz --decompress /path/to/image.img.xz first. In the latter, you'll choose "No filter", "Custom image" and your USB drive (not mounted).
Once the disk is prepared, you'll need to resize it via these command (in a terminal):
$ sudo e2fsck /dev/sdX3
[...]
$ sudo resize2fs /dev/sdX3
[...]
Replace X with the drive letter (if unsure, use lsblk to find out). You need at least 8GB drive, a 16GB is even better.
Booting to console
On the device:
- Start in recovery mode, and select
Boot from internal image(yes, that one) - Press
Ctrl+Alt+⟳to open the main console - Login as root with the password you've set before
- Type what's written on the screen to disable rootfs verification
- Then type:
crossystem dev_boot_usb=1 dev_boot_altfw=1 - Type
sync - Type
poweroffand wait until the device powers off (few sec)
Post reboot
You can now select the Boot from external drive in the menu, provided you've plugged your USB drive on the device.
It should load PostmarketOS.
- Login with
userand147147for the credentials. - Start a console (in
Systemcategorie) - Type
sudo apk add pmbootstrap(type147147for the password) - If it fails, you'll need to set up the WIFI or Ethernet connection (bottom right icon). I'm connected via a USB hub with Ethernet, so I didn't had to do anything
- Type
pmbootstrap init - Select default value for the 2 first prompts (press
Enter) - Select either
edgeor the last "stable" version (likev24.12) - Type the first password
147147(this isn't the password of the final user but the current user password) - Choose
googleas vendor (notqemu) - Choose
trogdoras device codename - Choose the desired username
- Select the default provided for wifi (Enter)
- Select the user interface of your choice. I'm using
plasma-desktop - Select default for systemd question and all next question until Locale
- Change your locale to your choice
- Choose the name of the device
- Select default values for everything else until you're back to the prompt
- Type
pmbootstrap install --disk=/dev/mmcblk1 - Type
yfor overwriting - Type
147147for user password - Let it prepare installation
- Type your final user password twice
- Say
yto Erase question - Let it finish installation
- Type
syncat the prompt - Type
pmbootstrap shutdownand147147for the user password - Reboot and unplug USB drive.
You might want to add the screen rotation trick found here too.
Post install
I wasn't fond of the defaut key mapping on the keyboard, it's too Chromesque. In order to get back a more conventional keyboard mapping, I had to change the mapping following these steps:
Start up keyd by default
$ sudo rm /etc/keyd/default.conf
$ sudo su
# cat > /usr/lib/systemd/system/keyd.service << EOF
[Unit]
Description=key remapping daemon

[Service]
Type=simple
ExecStart=/usr/bin/keyd

[Install]
WantedBy=multi-user.target
EOF
# cat > /etc/keyd/default.conf << EOF
[Unit]
Description=key remapping daemon

[Service]
Type=simple
ExecStart=/usr/bin/keyd

[Install]
WantedBy=multi-user.target

EOF
# cat > /etc/keyd/default.conf << EOF
[ids]
k:18d1:5057

[main]
leftmeta = capslock
sleep = delete
refresh = forward

[meta]
back = f1
refresh = f2
zoom = f3
scale = f4
brightnessdown = f5
brightnessup = f6
micmute = f7
mute = f8
volumedown = f9
volumeup = f10
sleep = f12

[control]
backspace = delete

[alt]
up = pageup
down = pagedown
left = home
right = end
leftmeta = rightmeta
back = A-f1
refresh = A-f2
zoom = A-f3
scale = A-f4
brightnessdown = A-f5
brightnessup = A-f6
micmute = A-f7
mute = A-f8
volumedown = A-f9
volumeup = A-f10
sleep = A-f12

[control+alt]
sleep = C-A-delete
back = C-A-f1
refresh = C-A-f2
zoom = C-A-f3
scale = C-A-f4
brightnessdown = C-A-f5
brightnessup = C-A-f6
micmute = C-A-f7
mute = C-A-f8
volumedown = C-A-f9
volumeup = C-A-f10

EOF
# systemctl enable keyd
# systemctl start keyd
That way, the Caps lock key works as Capslock, but you can still get the Meta key (Windows key or Apple key on standard keyboard), by pressing Alt + Caps lock. The 🔒 key is mapped to Delete
All first row keys are mapped to their extended function, unless Caps lock is used with them (or Control + Alt), in that case they work as F1...F10 keys (resp. Ctrl+Alt+F1...F10).
Alt + arrow keys are mapped to Page Up, Page Down, Home, End.
Fix SDDM login screen orientation
By default SDDM login screen use portrait mode, which is a bit awkward for a "laptop" device. This can be fixed like this:
$ sudo nano /etc/sddm.conf.d/kde_settings.confModify [General] section so it looks like:
[General]
HaltCommand=
RebootCommand=
DisplayServer=wayland
GreeterEnvironment=QT_WAYLAND_SHELL_INTEGRATION=layer-shell

[Wayland]
CompositorCommand=kwin_wayland --no-lockscreen --inputmethod maliit-keyboard --width 2000 --height 1200
Save with Ctrl+O followed by Ctrl+X